If you are retrofitting AI analytics on top of an existing CCTV network, camera specs decide whether AI works “beautifully in a demo” or works on a random Tuesday night when the shop is busy, lights are uneven, and your guard is not watching the monitor.
Here’s the core truth most buyers learn late:
AI accuracy is usually limited by pixel density, motion blur, and lighting, not by “4MP vs 8MP” alone.
You can keep 70–90% of your existing cameras, but you must “upgrade the right 10–30%” at the choke points where you actually need identification, reading, or evidence.
This guide is written for Indian deployments: mixed brands, mixed ages of cameras, uneven lighting, dust, IR reflections, power fluctuations, and bandwidth constraints.
Table of contents
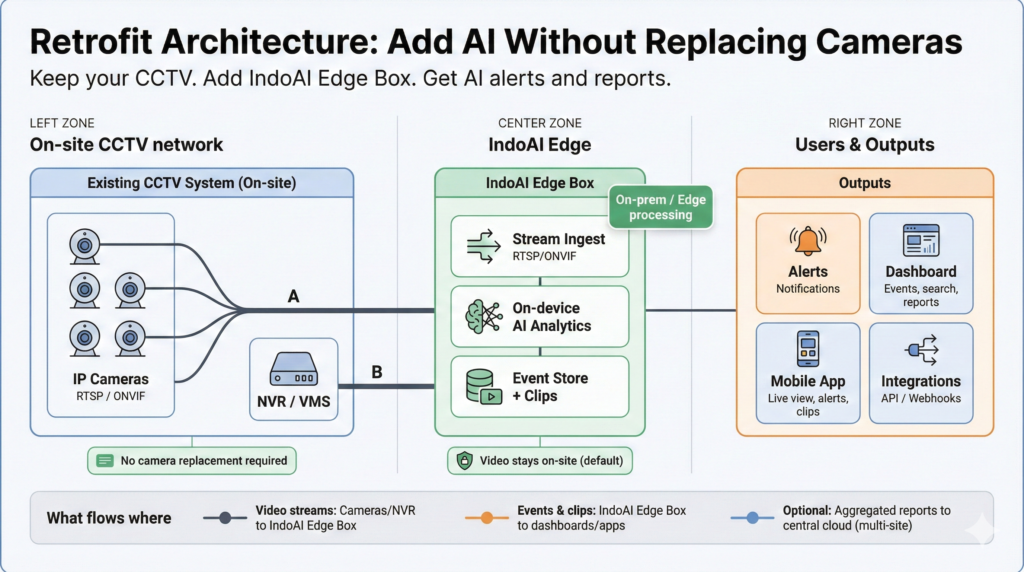
Where IndoAI fits in a retrofit purchase
IndoAI’s typical retrofit architecture is simple:
- Keep your existing IP cameras and NVR/VMS
- Add IndoAI Edge Box inside your local network to pull streams (RTSP/ONVIF)
- Run analytics locally (privacy, low latency, lower cloud bandwidth)
- Get alerts, reports, dashboards, and searchable events
- Upgrade capability over time by installing additional AI models (Appization)
But IndoAI (or any video AI) can only be as good as the video it receives. That’s why this blog focuses on camera-side decisions that improve AI outcomes immediately, without forcing a full camera replacement
The single most important concept: pixel density (not megapixels)
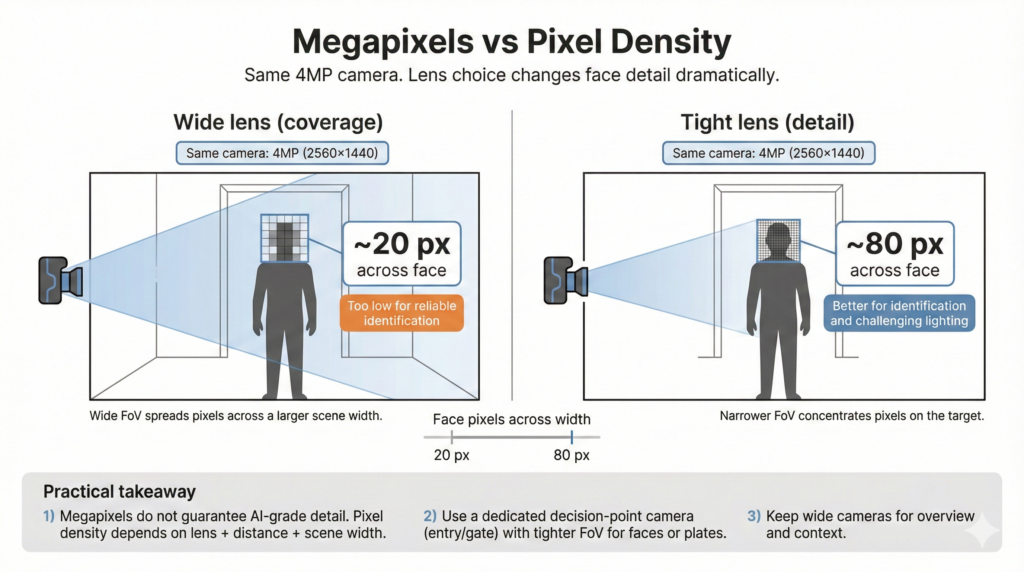
Megapixels describe the total pixels in the frame. Pixel density describes how many pixels cover the object you care about (a face, a plate, a flame, a hand gesture).
Security industry planning commonly uses the IEC 62676-4 pixel-density model (DORI). For the 2014 standard, Axis summarizes typical thresholds like:
- Detection: 25 px/m
- Observation: 63 px/m
- Recognition: 125 px/m
- Identification: 250 px/m
In the 2025 update (newer terminology), thresholds go higher for “validate” and “scrutinize”, including 500 px/m and 1500 px/m levels for very high certainty tasks.
Face tasks need pixels across the face (practical rule)
Axis notes the classic rule of thumb: 40 pixels across a face for identification (good conditions), and also discusses why higher targets like 80 pixels across a face are used for challenging conditions in their tests. What this means in practice:
If your camera is wide-angle and mounted too high/far, a “4MP camera” may still give only 15–25 pixels across a face at the door, and face analytics will struggle no matter how good the AI is.

Camera spec cheat-sheet (India retrofit buyers)
Use this as a starting baseline, then tune per use case.
1) Resolution (and why 4MP often beats 8MP in the real world)
- 2MP (1080p): Good for general monitoring, basic intrusion, fire/smoke in small areas, simple motion-based analytics.
- 4MP (1440p): Best default for many AI tasks because it increases pixel density without exploding bandwidth/storage.
- 8MP (4K): Use selectively (large areas, wide scenes, forensic review), but only if you can support bitrate, lens quality, and compute decode capacity.
Consulting lens: Don’t upgrade “all cameras to 4K.” Upgrade only where pixel density is the bottleneck: gates, entries, cash counters, critical aisles, safety zones.
2) FPS (frames per second): choose based on motion and the action you must detect
- 10–15 FPS: Enough for most people-counting, queueing, occupancy, intrusion, fire/smoke.
- 15–20 FPS: Safer for faster movement, shoplifting gestures, workplace safety events.
- 25–30 FPS: Mainly needed for fast motion scenes like vehicle plates at speed, forklifts, running crowds.
Also note: the newer IEC 62676-4:2025 update explicitly discusses scene requirements relating to FPS (a sign that FPS is not a cosmetic spec anymore).
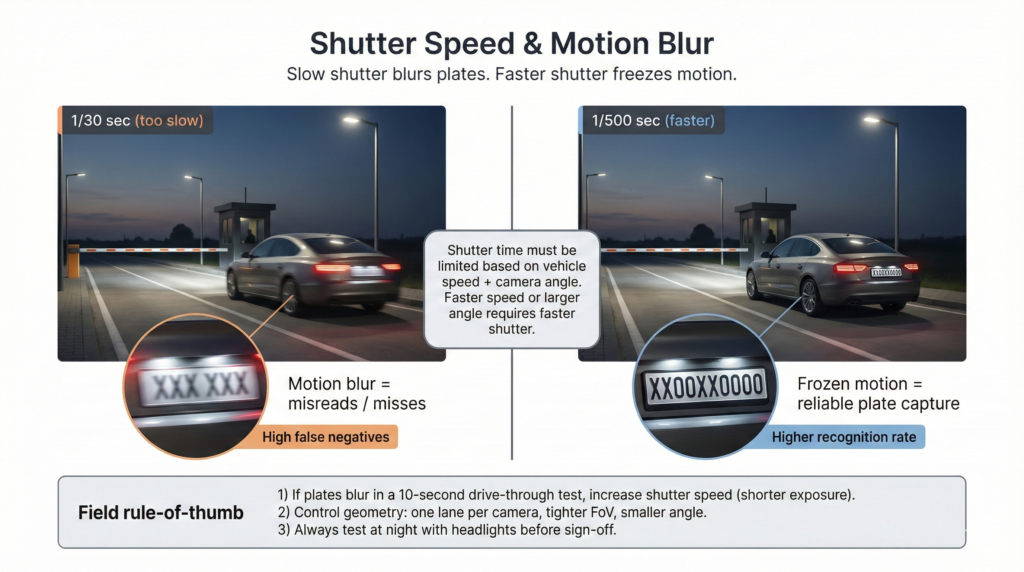
3) Shutter speed (often more important than FPS for plates and fast movement)
For license plate capture, motion blur is usually the killer. Axis provides a practical table showing recommended max shutter time based on vehicle speed and camera angle, with examples down to a few milliseconds (1 ms = 1/1000s).
Practical interpretation for Indian gates:
- If cars are moving and the camera is at an angle, you often need shutter around 1/250 to 1/1000 range, depending on speed and geometry. (Use the Axis table to sanity-check your case.)
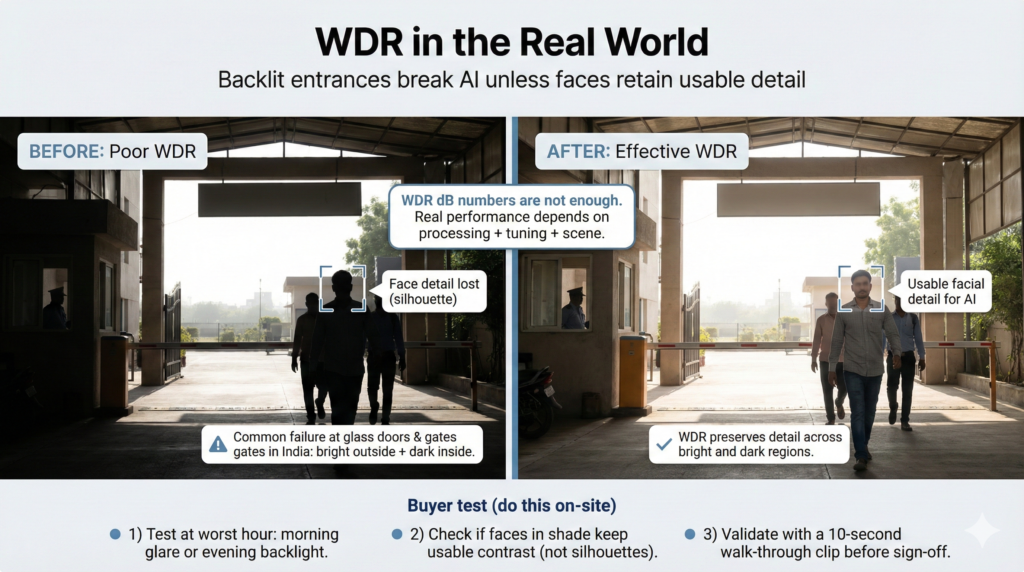
4) WDR (Wide Dynamic Range): ignore marketing dB, test forensic usability
Backlit entrances are everywhere in India: glass doors, strong sunlight outside, dim lobby inside.
Axis explicitly warns that dB values are only part of the story, and real performance depends on processing and forensic usability.
Practical buying rule:
For AI, you want usable subject detail (faces, hands, objects), not just a “balanced looking” image. Always test WDR at the actual time-of-day and angle.
5) Low-light: sensor + optics + processing (IR can help or hurt)
Low-light is where many “AI accuracy complaints” originate.
- Sony describes STARVIS as technology designed to capture very faint light and deliver low-noise imaging in dark scenes.
- Axis describes Lightfinder as enabling high-quality color video in very low light using sensor + lens + optimized processing.
IR is not automatically good: IR glare, reflective surfaces, and overexposure can reduce usable detail. For plates, Axis even recommends switching WDR off in some cases because WDR techniques can introduce motion artifacts for moving vehicles.
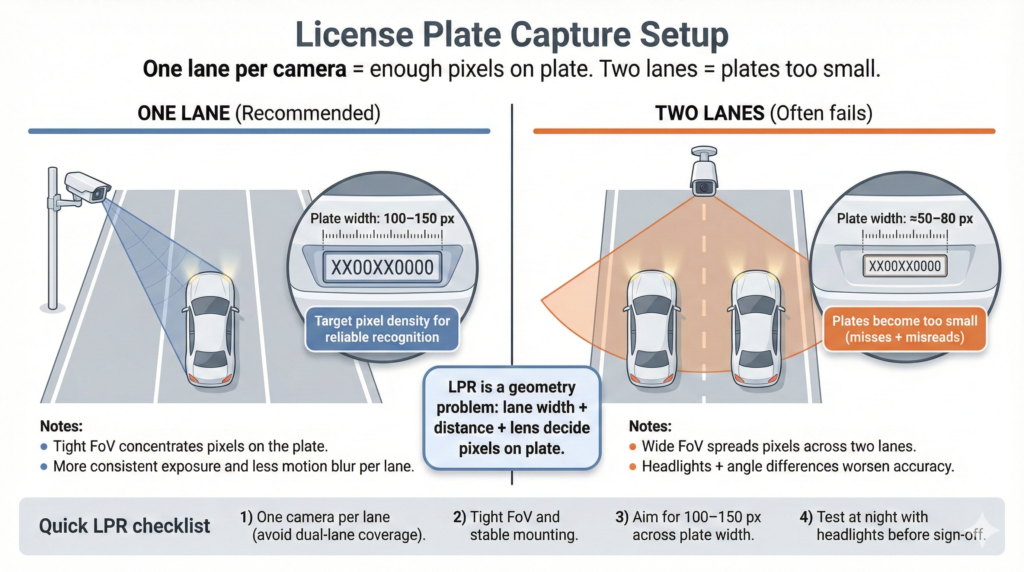
6) Lens selection: the spec most people under-buy
The lens decides field of view, pixel density, and distortion. A cheap wide lens can make your “8MP” behave like a low-detail camera at the target area.
Rule: If the task is identification (faces, plates), use:
- Varifocal lens at gates/entries to tighten field of view to the lane/door you care about
- Avoid trying to cover “two gates with one camera” if you need plates or faces reliably
Axis’ license plate guidance shows how zooming changes pixels on plate dramatically, even at the same resolution.
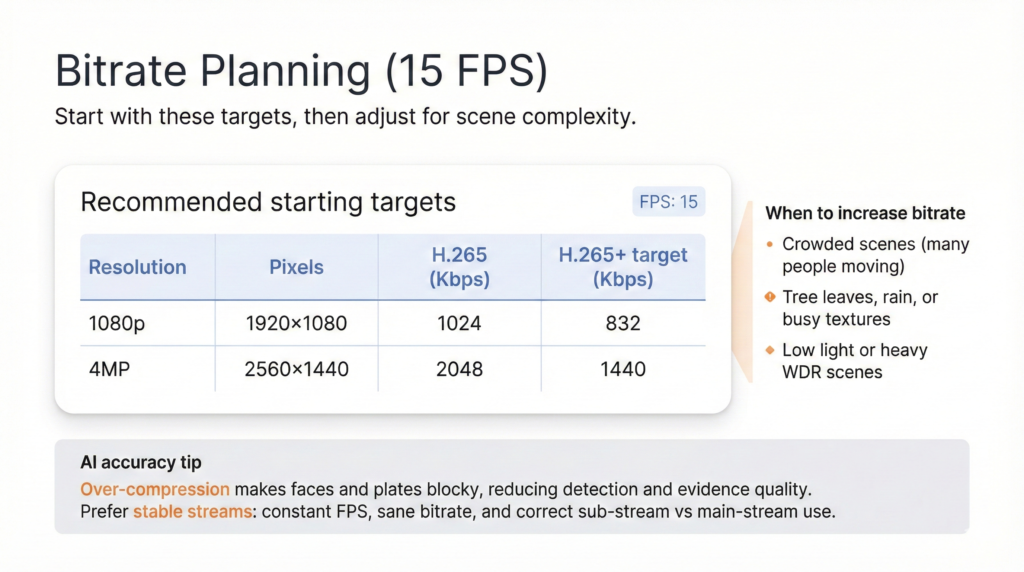
7) Codec and bitrate: AI needs clarity, not just compression
Retrofit deployments often fail because the stream is over-compressed.
Hikvision publishes recommended bitrates by resolution, FPS, and codec. For example at 15 FPS:
- 1080p (H.265): 1024 Kbps
- 4MP (H.265): 2048 Kbps
- 1080p (H.265+ target): 832 Kbps
- 4MP (H.265+ target): 1440 Kbps
These are “general resolution” recommendations; complex scenes may need higher settings (the Hikvision sheet itself advises increasing bitrate for complex environments). AI-specific note: If you push bitrate too low, faces become blocky and edges smear, hurting both detection and evidence.
The integration specs that matter in retrofit (RTSP/ONVIF and metadata)
Most retrofit AI stacks pull streams via ONVIF/RTSP. For interoperability, ONVIF Profiles matter:
- ONVIF Profile S: baseline for IP video streaming control between device and client.
- ONVIF Profile T: adds advanced streaming features like H.265, imaging settings, events, and mandatory metadata streaming.
Why you should care: If you want cleaner events, timestamps, motion/tamper events, and better stream control across mixed brands, Profile T support reduces integration friction.
12 real-world Indian deployment examples (specs + placement that actually work)
These examples are designed to match what Indian buyers really deploy, and what typically breaks first.
Example 1: School classroom group attendance (front-of-class camera)
Goal: identify student presence reliably, not cinematic quality
- Resolution: 4MP preferred
- FPS: 10–15
- Lens: tighter field of view on student seating area (avoid covering windows)
- Lighting: avoid backlit windows; if unavoidable, strong WDR required
Placement: front wall, slightly above eye level, not ceiling corner (ceiling corner makes faces too small)
Example 2: Office entry attendance (single door, peak rush)
Goal: faces usable during fast walking and mixed lighting
- Target pixel density: aim at least “identification-grade” (40 px/face minimum; more if challenging)
- FPS: 15–20
- WDR: must be tested at morning sunlight angles
Placement: near eye level or slightly above; avoid mounting too high
Example 3: Hostel corridor intrusion at night
Goal: detect and track humans; faces sometimes needed
- Low-light: prioritize sensor and processing; consider low-light technologies like STARVIS-class sensors
- IR: avoid hotspots, avoid reflective paint/glossy floors
- FPS: 12–15
Placement: corridor length coverage with overlapping zones, not one ultra-wide at one end
Example 4: Housing society main gate, number plate recognition
Goal: read plates day and night
- Plate pixel target: most LPR software needs 100–150 pixels across plate width
- Shutter: set max shutter based on speed and angle (often a few ms)
- WDR: may need off for plates in motion (depends on implementation)
Placement: dedicate one camera per lane, tighten view to lane
Example 5: Factory main gate truck plates (higher speeds, dust)
Goal: plates plus vehicle classification
- Use varifocal lens, narrow view
- FPS: 25–30 if speed is high
- External IR often required; IR range needs power scaling with distance
Placement: far enough capture distance to give analytics time; Axis provides a capture distance table by speed (use as guide).
Example 6: Retail cash counter (theft evidence and cashier behavior)
Goal: clear hands, objects, POS area
- Resolution: 4MP
- FPS: 15–20
- WDR: critical if bright entrance nearby
Placement: top-down is good for hands, but keep an angle that still shows faces if needed
Example 7: Supermarket aisle people counting and heatmaps
Goal: count and direction, not identity
- Resolution: 2MP can work if placed correctly
- FPS: 10–12
- Lens: wide but not fish-eye unless you have strong dewarping support
Placement: ceiling mount is acceptable because identity is not required
Example 8: Warehouse dock door (shrinkage, wrong dispatch, safety)
Goal: event evidence and workflow visibility (forklifts, cartons, persons)
- Resolution: 4MP
- FPS: 15–20
- Bitrate: don’t starve the stream; use codec planning references to avoid over-compression
Placement: cover dock threshold and staging area, not just a wide wall shot
Example 9: Fire and smoke detection in electrical room
Goal: early visual smoke, not just flames
- Resolution: 2MP or 4MP
- FPS: 10–15
- Low-light: avoid aggressive noise reduction that smears faint smoke texture (test on-site)
Placement: avoid pointing directly at reflective panels or indicator lights
Example 10: Commercial kitchen smoke and hygiene monitoring
Goal: smoke, crowding, unsafe behavior
- WDR: often needed due to hot surfaces and mixed lighting
- FPS: 12–15
Placement: avoid steam blowing directly into lens path; keep serviceable cleaning access
Example 11: Hospital OT entry (no-mobile enforcement, authorized entry)
Goal: compliance, identity at door
- Pixel density: prioritize face pixels at the doorway
- WDR: strong if corridor bright, OT dim
Placement: door-centric view, not a wide corridor view
Example 12: Temple or event crowd management (counting, congestion alerts)
Goal: flow and density, not identity
- Resolution: 4MP useful for large open scenes
- FPS: 10–15
Codec: keep bitrate adequate for moving crowds; avoid extreme compression
Placement: elevated vantage, stable angles, avoid flags/banners blocking view
A practical 7-step camera audit for AI retrofit buyers (use this before spending)
- List outcomes per camera
For each camera location, decide: detect, track, identify, read plate, detect smoke. - Measure pixel density at the target zone
Use a quick pixel counter tool in your VMS if available, or do a screenshot check. Use DORI thresholds as sanity reference. - Check motion blur
Walk test at rush hour; for plates, test moving vehicles. Use shutter guidance tables where applicable. - Test worst lighting hour
Morning glare, evening backlight, night IR reflections. Do not trust brochure WDR dB alone. - Inspect stream settings
Verify FPS, codec, bitrate. Compare against published bitrate guidance, then tune upward for complex scenes. - Decide which cameras to upgrade
Upgrade only where the outcome requires it: gates, entries, cash counters, critical safety zones. - Deploy IndoAI Edge Box and validate with a pilot
Start with 8–32 cameras, prove value, then scale. In mixed-brand environments, prefer ONVIF Profile T where possible for smoother streaming, events, and metadata.